red5
Achiever
- Joined
- May 14, 2016
- Messages
- 1,929
Wotofo Profile M RTA review by Antony Lord
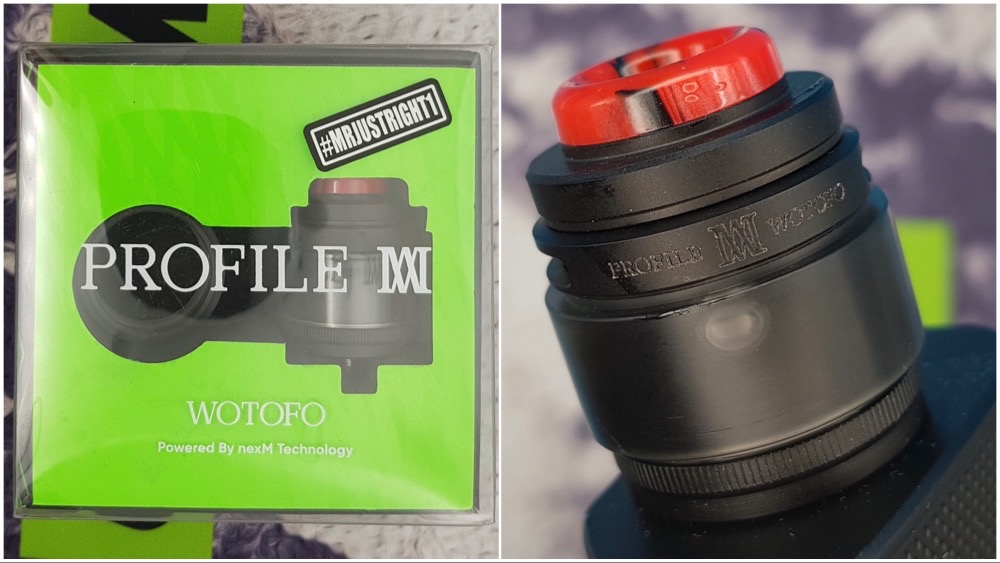
Healthcabin got in touch and asked if I’d like to take a look at the updated Profile M RTA from Wotofo. I have something of a love hate relationship with mesh RTA’s, I love the vape from them but I hate wicking the things and how much cotton is used, so I was keen to see what improvements have been made over the original Profile Unity RTA.
This came in typical Wotofo packaging but I was glad to see that they’ve actually put finger cutouts in the plastic lid this time which meant it was actually easy to open the box for once. Previously the lids have had a tendency to weld themselves on and this simple addition makes all the difference.
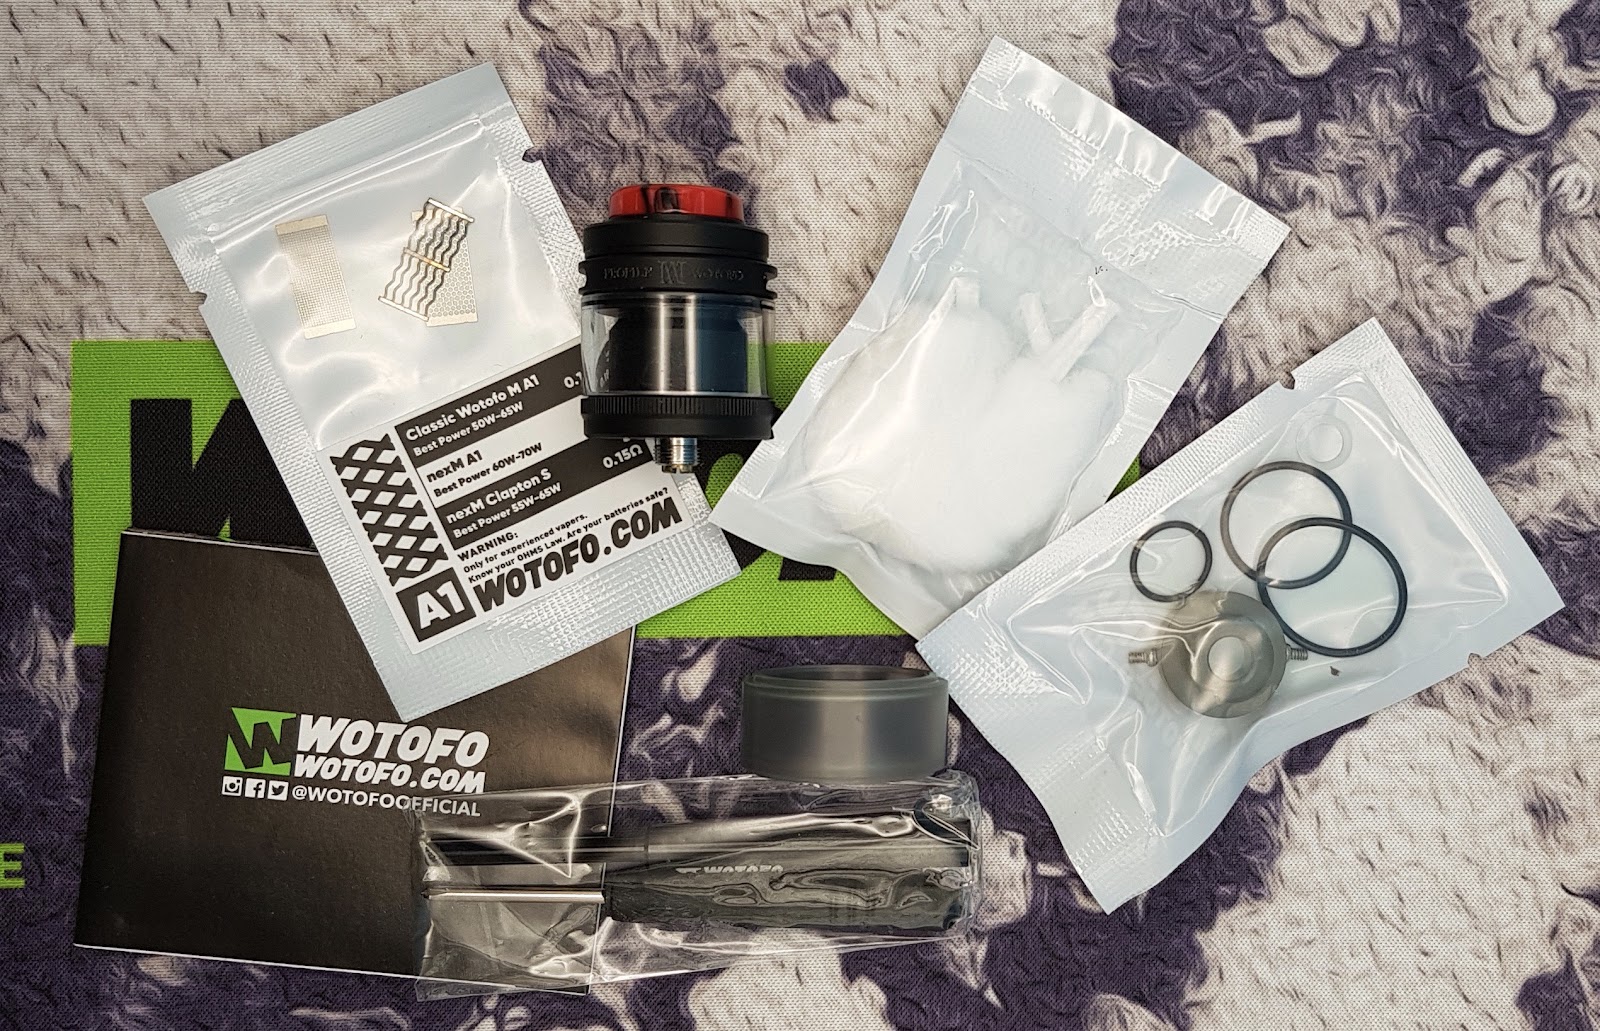
There’s actually a lot included in this tiny box as is typical for Wotofo RTAs including two drip tips, cotton, three mesh coils and a screwdriver and coil tool.

The Profile M is much more compact than its predecessor at just 27.8mm tall (excluding drip tip and 510) and 24.6mm at the base although it does bulge out to 25.5mm further up (and even more with the bubble tank. This now has a sliding fill system although this can be removed for cleaning, this has proved to be both a blessing and a curse though…. whilst it made it easy to fill I found that you need to hold it all bolt upright or liquid will come out of the air relief hole now located under the drip tip and you also have to make sure the rubber seal is seated properly once you’re done as it tends to lift up when you’re removing your elquid bottle which then prevents smooth closing of the top. There’s no spare seal included in the box either so you don’t want to damaging it!
With the preinstalled straight glass you have a 3.1ml capacity or you can use the included bubble glass which brings this up to 4.0ml. I opted to use the bubble glass and I have to say it looks quite good, I like the slightly rugged angular appearance. One disappointment here however is that both of the included “glass” sections are actually PCTG as found in many modern pod kits and whilst this has proved to be quite resilient, and might be a bonus if you’re the sort of person who drops their kit a lot, obvious caution should be used with tank crackers!
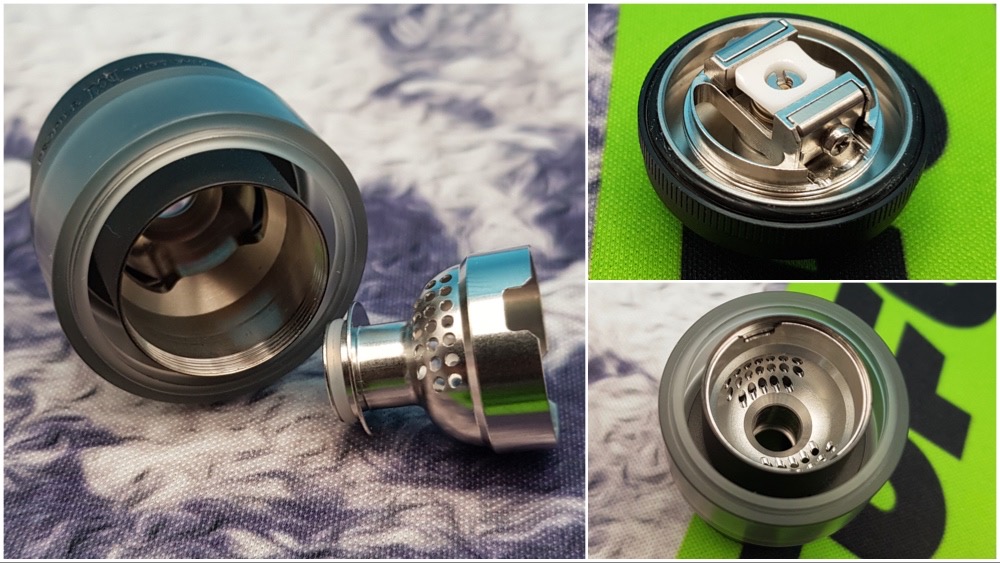
Moving onto the build deck this should look instantly familiar with it’s clamp system and spring loaded ceramic block which helps keep the cotton in contact with the coil by providing upward pressure. The airflow has now moved to a top down system which is channeled to the coil via a chamber reducer, this is held in the chimney with an o-ring and directs the airflow to the top of the coil. One obvious benefit here is that this means the build deck no longer spins around making it easier to build on and allowing you to screw the tank on without needing to first remove it from your mod.
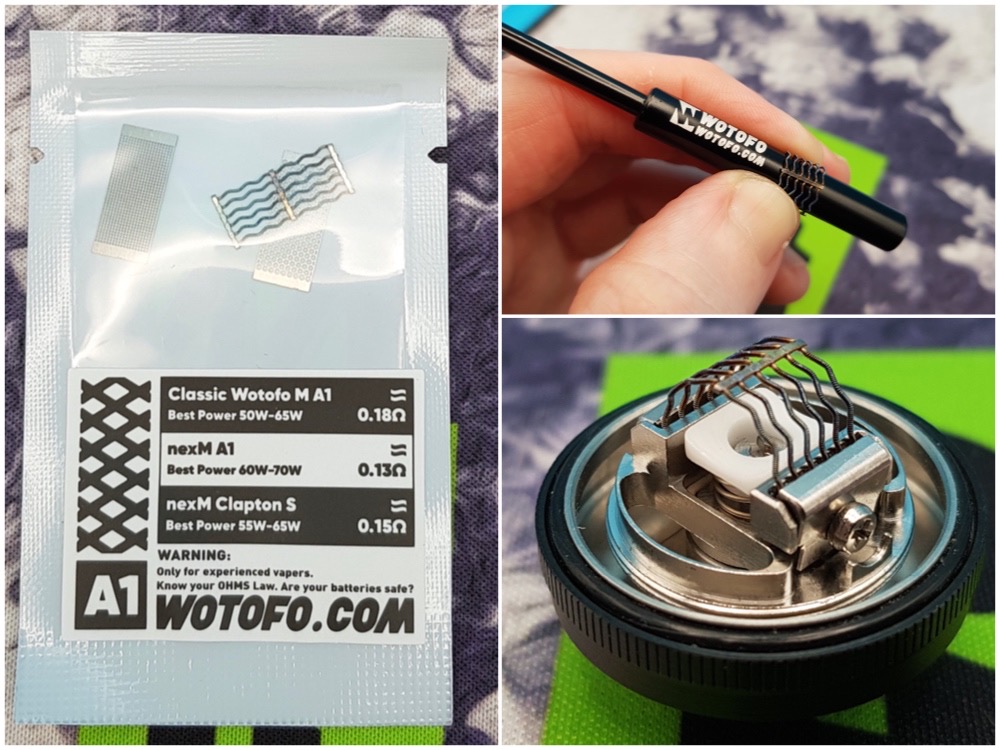
There are three mesh coils included in the package, I thought I’d try out the Clapton S one first as I’m sure this is what most people are interested in. The process is the the same as other mesh RTAs, bend the coil around the included coil and then clamp it in place on the deck before giving it a quick pulse at low wattage to check it’s working.. it really doesn’t get any easier, now onto the tricky bit, wicking!
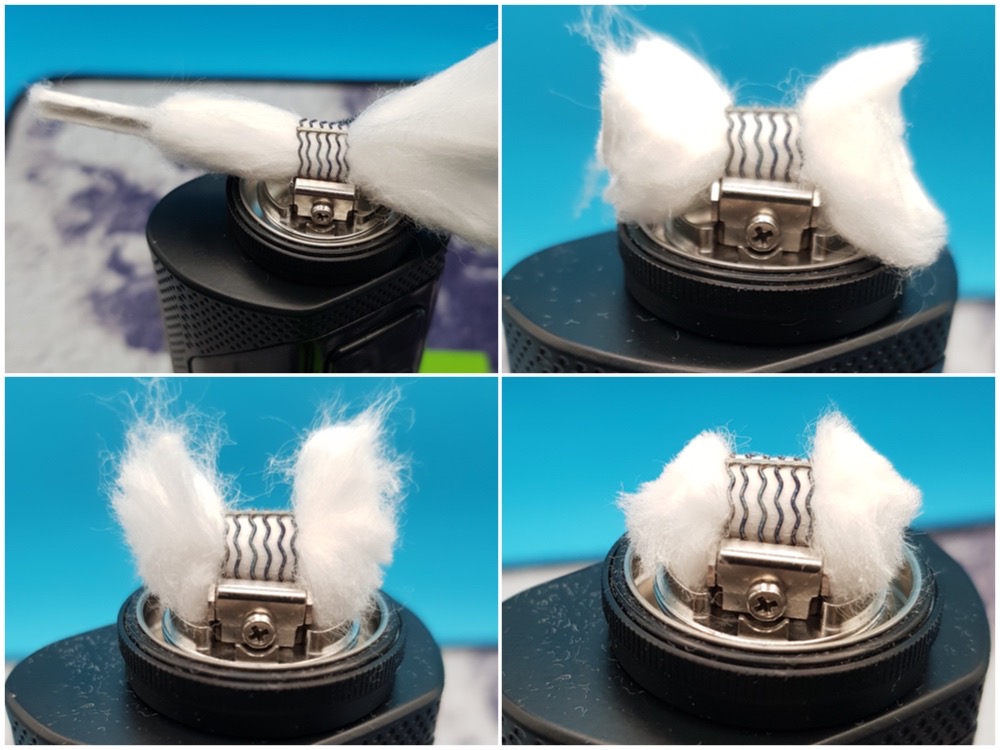
For this first go I opted to use one of the included wicks, pull it though the coil whilst applying slight downward pressure on the ceramic plate and try not to distort the coil. Next cut the wicks at 45 degrees and tuck the tails into the large wick ports, the key here is to have enough wick to fill the ports whilst keeping it loose in the port you don’t want to jam them full! Give the top of the wicks a bit of a trim then juice everything up.
This worked very well, I got a really consistent vape at 60 watts with plenty of bubbles being formed an really top notch flavour with the airflow set at about two thirds open. I didn’t want to use this for long because of the nichrome out wrap so I swapped out to one of the kanthal mesh coils instead which proved to be just as good. I used a Muji pad here and this took nearly a full pad so if you don’t like wasting cotton look elsewhere! I wasn’t a fan of either included drip tip, the default one appears to have been chosen for its looks rather than any practical use so this was quickly changed out!
Pros:
Cons:
Conclusion:
Another great entry from Wotofo, the Profile M RTA takes the original Profile Unity design and gives it a more up to date twist. If you’re not a fan of mesh RTAs then this likely won’t change your mind and it’s still not without its flaws but get that wicking right and you’ll have a whale of a time
Many thanks to @Healthcabin for sending the Profile M RTA out for review, they also asked me to remind you that you need to be logged into their site to see the best prices.
Healthcabin got in touch and asked if I’d like to take a look at the updated Profile M RTA from Wotofo. I have something of a love hate relationship with mesh RTA’s, I love the vape from them but I hate wicking the things and how much cotton is used, so I was keen to see what improvements have been made over the original Profile Unity RTA.
This came in typical Wotofo packaging but I was glad to see that they’ve actually put finger cutouts in the plastic lid this time which meant it was actually easy to open the box for once. Previously the lids have had a tendency to weld themselves on and this simple addition makes all the difference.
There’s actually a lot included in this tiny box as is typical for Wotofo RTAs including two drip tips, cotton, three mesh coils and a screwdriver and coil tool.
The Profile M is much more compact than its predecessor at just 27.8mm tall (excluding drip tip and 510) and 24.6mm at the base although it does bulge out to 25.5mm further up (and even more with the bubble tank. This now has a sliding fill system although this can be removed for cleaning, this has proved to be both a blessing and a curse though…. whilst it made it easy to fill I found that you need to hold it all bolt upright or liquid will come out of the air relief hole now located under the drip tip and you also have to make sure the rubber seal is seated properly once you’re done as it tends to lift up when you’re removing your elquid bottle which then prevents smooth closing of the top. There’s no spare seal included in the box either so you don’t want to damaging it!
With the preinstalled straight glass you have a 3.1ml capacity or you can use the included bubble glass which brings this up to 4.0ml. I opted to use the bubble glass and I have to say it looks quite good, I like the slightly rugged angular appearance. One disappointment here however is that both of the included “glass” sections are actually PCTG as found in many modern pod kits and whilst this has proved to be quite resilient, and might be a bonus if you’re the sort of person who drops their kit a lot, obvious caution should be used with tank crackers!
Moving onto the build deck this should look instantly familiar with it’s clamp system and spring loaded ceramic block which helps keep the cotton in contact with the coil by providing upward pressure. The airflow has now moved to a top down system which is channeled to the coil via a chamber reducer, this is held in the chimney with an o-ring and directs the airflow to the top of the coil. One obvious benefit here is that this means the build deck no longer spins around making it easier to build on and allowing you to screw the tank on without needing to first remove it from your mod.
There are three mesh coils included in the package, I thought I’d try out the Clapton S one first as I’m sure this is what most people are interested in. The process is the the same as other mesh RTAs, bend the coil around the included coil and then clamp it in place on the deck before giving it a quick pulse at low wattage to check it’s working.. it really doesn’t get any easier, now onto the tricky bit, wicking!
For this first go I opted to use one of the included wicks, pull it though the coil whilst applying slight downward pressure on the ceramic plate and try not to distort the coil. Next cut the wicks at 45 degrees and tuck the tails into the large wick ports, the key here is to have enough wick to fill the ports whilst keeping it loose in the port you don’t want to jam them full! Give the top of the wicks a bit of a trim then juice everything up.
This worked very well, I got a really consistent vape at 60 watts with plenty of bubbles being formed an really top notch flavour with the airflow set at about two thirds open. I didn’t want to use this for long because of the nichrome out wrap so I swapped out to one of the kanthal mesh coils instead which proved to be just as good. I used a Muji pad here and this took nearly a full pad so if you don’t like wasting cotton look elsewhere! I wasn’t a fan of either included drip tip, the default one appears to have been chosen for its looks rather than any practical use so this was quickly changed out!
Pros:
- Compact update to the Profile RTA
- Easy to build
- Build deck now fixed in place
Cons:
- Both “glass” sections are PCTG
Conclusion:
Another great entry from Wotofo, the Profile M RTA takes the original Profile Unity design and gives it a more up to date twist. If you’re not a fan of mesh RTAs then this likely won’t change your mind and it’s still not without its flaws but get that wicking right and you’ll have a whale of a time
Many thanks to @Healthcabin for sending the Profile M RTA out for review, they also asked me to remind you that you need to be logged into their site to see the best prices.
Last edited:


