Diablo
Achiever
- Joined
- Oct 14, 2013
- Messages
- 1,784
Good old aldi, See, all the crap I buy in little boxes comes in handy eventually.
Note:- this method of filling is identical in every way with the giant and the mega apart from the width of the heat shrink. The mega needs some 2mm if memory serves as opposed to the 2.5 for the giant.
My Kanger Giant arrived today. Figured I would keep the glass tank on it this time, see how fast I burn through a tank. filled it, tipped it upright and as per the mega, it looks half empty (pessimist that I am, some might see it as half full), so, moving on, I used it for most of the day and when I got home decided to try a little something to fill it higher than it wants to allow in normal use.
It should go without saying that overfilling the tank means that if you need to take it apart soon after filling, you WILL lose fluid. So if you find you had extra room for more fluid after you fill up, vape it away to a safe level to open and go higher next time. I underestimated how much liquid I could put in when I did this the first time.
I wasnt sure how much fluid I could get away with putting in, hence the not quite as full as I was actually aiming for picture, but I definitely got a good chunk more in the tank than it had earlier in the day during the first fill. Now I have an idea of the limit I can put more in next time, but until I vape about a third of the current fluid level away I cant open it again without risking some major leakage.
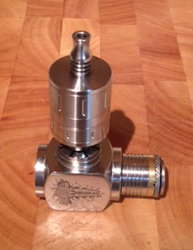
Anyway, this was a normal surface tension fill earlier today. forgive the temporary sig batt tube and gopping drip tip, both off now. (by surface tension, I mean that I ordinarily fill the aeromega until you can see the fluid about ready to overflow into the airtube. I filled the Giant the same way.
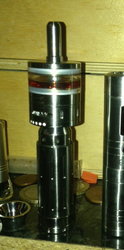
This next image was how it looked after the 'underestimated' overfill, not a lot more in, but you can see there is definitely more than the normal fill. Its actually leaning slightly away in this pic and the fluid level is above the glass at the back (you might be able to see it, I know its there so the curve in the fluid makes more sense to me on the right of the tank in the image).
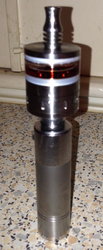
Post office tower we are calling this look.
As I said, I didnt go too far on filling as I wasnt sure what I could safely get in without problems and it was initially an experiment to see if it was going to work. Turns out my 'guestimate' was flawed, but now I know it works and there is room for more, the next fill will be brimming.
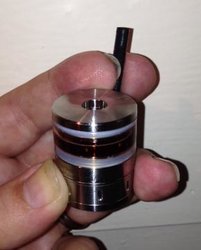
How to do it? ridiculously easy. 2.5mm heatshrink. It slips through the tanks centre tube perfectly, and I mean perfectly. Makes a seal without being either too tight or slack. I pushed it through with a short amount standing proud in the tanks filling area.
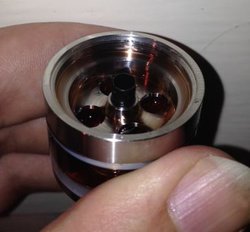
I obviously didnt go to the top of the heatshrink here and I leave it to others to work out their own safe maximum (I should perhaps have taken a pic as I had reached the (in my mind) fill limit, but the fact is I didnt. sorry. Anyway, the heatshrink proved itself to be making a perfect seal when I topped it up to my self imposed limit. I actually put just enough fluid in to totally fill the inner bit where the four holes are, I should have (could have) gone higher though.
The best part comes last though. The idea initially involved the worry of the how the air tube was going to push the heat shrink out with the obvious potential for spillage. It turned out I needn't have worried. The heatshrink is so thin that the atty base tube slides back in 'through' the heatshrink without disturbing it. I had thought there might be issues, but because the tube slides into the heatshrink, it only gets pushed down when the rubber seal of the base tube meets it, by which time the tank is nearly fully sealed again anyway. Even if there had been potential for seepage, the fact that the airtube is now filling the heatshrink as the rubber collar meets the heatshrink reduces the risk of fluid down the air tube to almost nothing.
Not one drop got into the tube itself overfilling the tank this way.
Once the tank was screwed back together the heatshrink was finally (and very easily) pulled out. There was no added resistance with the atty screwed back together so there is sufficient clearance between the base plate air tube and the heatshrink to not cause a problem.
It would have taken more fluid than I put in, It was only my lack of nerve that left it only three quarters full, but filling it this way definitely works fine. Hopefully the pics are good enough to show it. Obviously I am not able to go back to rectify the lack of 'Fullness' without fluid loss (unlike putting it together when filled, it would be difficult if not impossible to chase the atty base out with the heatshrink keeping good contact and not lose fluid). But next time I fill it, it will be a full top off. That said, it might take me a day or two to get back to safe limits for taking the base off.
forgot to say, Aldi heatshrink is cut to short lengths, they are longer than the height of a fully assembled Giant atty and Easily more than long enough for the task.
Note:- this method of filling is identical in every way with the giant and the mega apart from the width of the heat shrink. The mega needs some 2mm if memory serves as opposed to the 2.5 for the giant.
My Kanger Giant arrived today. Figured I would keep the glass tank on it this time, see how fast I burn through a tank. filled it, tipped it upright and as per the mega, it looks half empty (pessimist that I am, some might see it as half full), so, moving on, I used it for most of the day and when I got home decided to try a little something to fill it higher than it wants to allow in normal use.
It should go without saying that overfilling the tank means that if you need to take it apart soon after filling, you WILL lose fluid. So if you find you had extra room for more fluid after you fill up, vape it away to a safe level to open and go higher next time. I underestimated how much liquid I could put in when I did this the first time.
I wasnt sure how much fluid I could get away with putting in, hence the not quite as full as I was actually aiming for picture, but I definitely got a good chunk more in the tank than it had earlier in the day during the first fill. Now I have an idea of the limit I can put more in next time, but until I vape about a third of the current fluid level away I cant open it again without risking some major leakage.
Anyway, this was a normal surface tension fill earlier today. forgive the temporary sig batt tube and gopping drip tip, both off now. (by surface tension, I mean that I ordinarily fill the aeromega until you can see the fluid about ready to overflow into the airtube. I filled the Giant the same way.

This next image was how it looked after the 'underestimated' overfill, not a lot more in, but you can see there is definitely more than the normal fill. Its actually leaning slightly away in this pic and the fluid level is above the glass at the back (you might be able to see it, I know its there so the curve in the fluid makes more sense to me on the right of the tank in the image).

Post office tower we are calling this look.
As I said, I didnt go too far on filling as I wasnt sure what I could safely get in without problems and it was initially an experiment to see if it was going to work. Turns out my 'guestimate' was flawed, but now I know it works and there is room for more, the next fill will be brimming.
How to do it? ridiculously easy. 2.5mm heatshrink. It slips through the tanks centre tube perfectly, and I mean perfectly. Makes a seal without being either too tight or slack. I pushed it through with a short amount standing proud in the tanks filling area.

I obviously didnt go to the top of the heatshrink here and I leave it to others to work out their own safe maximum (I should perhaps have taken a pic as I had reached the (in my mind) fill limit, but the fact is I didnt. sorry. Anyway, the heatshrink proved itself to be making a perfect seal when I topped it up to my self imposed limit. I actually put just enough fluid in to totally fill the inner bit where the four holes are, I should have (could have) gone higher though.
The best part comes last though. The idea initially involved the worry of the how the air tube was going to push the heat shrink out with the obvious potential for spillage. It turned out I needn't have worried. The heatshrink is so thin that the atty base tube slides back in 'through' the heatshrink without disturbing it. I had thought there might be issues, but because the tube slides into the heatshrink, it only gets pushed down when the rubber seal of the base tube meets it, by which time the tank is nearly fully sealed again anyway. Even if there had been potential for seepage, the fact that the airtube is now filling the heatshrink as the rubber collar meets the heatshrink reduces the risk of fluid down the air tube to almost nothing.
Not one drop got into the tube itself overfilling the tank this way.
Once the tank was screwed back together the heatshrink was finally (and very easily) pulled out. There was no added resistance with the atty screwed back together so there is sufficient clearance between the base plate air tube and the heatshrink to not cause a problem.

It would have taken more fluid than I put in, It was only my lack of nerve that left it only three quarters full, but filling it this way definitely works fine. Hopefully the pics are good enough to show it. Obviously I am not able to go back to rectify the lack of 'Fullness' without fluid loss (unlike putting it together when filled, it would be difficult if not impossible to chase the atty base out with the heatshrink keeping good contact and not lose fluid). But next time I fill it, it will be a full top off. That said, it might take me a day or two to get back to safe limits for taking the base off.
forgot to say, Aldi heatshrink is cut to short lengths, they are longer than the height of a fully assembled Giant atty and Easily more than long enough for the task.
Last edited:


![image[1].jpeg image[1].jpeg](https://data.forum.planetofthevapes.co.uk/attachments/20/20603-db524c7c2d96a8609ce765fcd8320a33.jpg)
![image[2].jpeg image[2].jpeg](https://data.forum.planetofthevapes.co.uk/attachments/20/20604-7b1cc844428515b16d221aa3e4813410.jpg)
![image[5].jpeg image[5].jpeg](https://data.forum.planetofthevapes.co.uk/attachments/20/20605-12c3f0ce53a707a404a81ff566964bb9.jpg)
![image[4].jpeg image[4].jpeg](https://data.forum.planetofthevapes.co.uk/attachments/20/20606-8d0b1dad354948f8aa3e6f041957fd93.jpg)


![image[1].jpeg image[1].jpeg](https://data.forum.planetofthevapes.co.uk/attachments/20/20712-a1c2140136b7aa50934c0bfcf7ab0012.jpg)
