Loco
Postman
- Joined
- May 16, 2014
- Messages
- 843
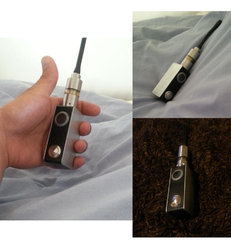
Finally got a chance to post up my pride and joy....my first ever build!
I've never built anything, nor do I have any electrical experience....So I spent a good bit of time researching ( A LOT of time ) and watched lots of tutorials...and had a little practice at soldering some scrap etc.
Nothings really that hard, just watch people that have spent time learning all the techniques and tricks, so you don't have to! Then practice!
To start, I had a very personal specification when it came to this build -
-Small
-Sexy
-SX350 chip
-Easy change of battery
Pretty normal....until
-Wide and heavy enough not to f-in fall over every time my lil'un bounces around. MUST BE STABLE ON A TABLE!!!!!
(anyone who had used a mvp with a half decent rba will have felt this pain at some time!)
- Strong!....I like to use my mod everywhere, so must be able to withstand some wear and tear!!!!
To meet this spec, I decided I will have to fabricate my own box, plus I want to be different! No hammond for me plzzz
Decided I wanted to use steel for the body. The walls are thin (2mm ish) to keep size down, but I still wanted it to be strong as F and to have a bit of heft.
Ally sides so magnets would work and to save some weight, stopping it pulling down my trousers in public.
So I made a shopping list...
SX350 (best chip out there IMO and easily enough power for me)
Silver coated stranded copper wiring with some tough teflon coating (was valve amplifier wiring originally I think)
Stealthvape OCD connector ( I hate adjustables! Top is low profile so easy to recess + no spring = less parts to wear out/break)
Keystone battery holder (best in the buisness IMO, gold plated contacts!)
Tiny ass vandal button ( thanks Seedy )
)
Sugru ( thanks Vapingbad )
)
Some seedy magnets
JB Weld
Step drill bit
Bit 'o' perspex
Some box section and some ally
Then came the design....I sat with my parts, aligned them how I thought would be the most 'space efficient' and drew everything up on paper. I was ambitious, as this is my first build, and I left very little /no space.
I didn't want to sacrifice on my choice of parts, especially the switch, as its one part you use the most!
Fabrication....
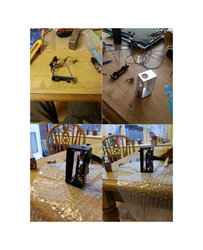
Heavily modified the keystone holder to make it fit ( dremel to the top and sides) then reinforced it with perspex where there was space.
Wired up everything roughly and upgraded the chip to make sure all was well.
Drilled up the box section in 3 places...510 / switch / screen. Used the 2mm step up to recess the 510 (using the taper)
Viced up the ally plate after cutting to rough size....filed away
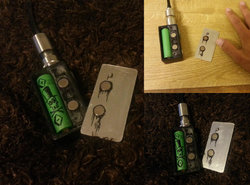
Soldered everything together neatly ( FLUX IS YOUR BEST FRIEND!!!), and then installed everything (paying attention to order, 510, switch, chip then battery holder)...As you can see in the pics, the switch only just fit after I bent the pins pretty damn far.
Used sugru around the chip and battery holder, smoothed everything off nicely
Fabricated the magnet holder fascia thingy...
Added magnets and pins to the face plate to hold it in place. The internal magnets are mounted in a 1mm recess, each magnet is 0.5mm thick, they make full contact and hold well, but the pins stop
any sliding around.
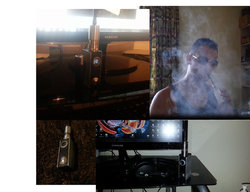
....Then I sat and had a hard earned vape...very satisfying feeling to have a vape your own mod!
Id definitely recommend having a go to anyone hesitating to just do it. With a chip like a sx350 its really not the difficult, just do some research and your away!
If I can do it with no experience in any of the skills required, I don't see why anyone cant if you have the time. It would be a lot simpler using a ready made box too!
I did have some hair pulling moments throughout the build...keystone holders when I purchased were only available from conrad, after paying extortionate shipping, they send me a 24v switch in place of may part, so much for German efficiency. 2nd order was the charm
This is actually v2...I tried making a box with some thicker walled extruded ally, the same as vapingbads DNA build. However the dimensions really just didn't allow for the chunkier chip. I filed away at the wall for a day or so, before realizing that it was going to be weak as F by the time I was done!
Upgrading the chip....if you use windows 7 or later, you may have a similar problem, feel free to pm me if you do. The upgrade process is simple, if the computer actually loads the f-in driver in the first place....had to use command prompt to disable driver signature. When that's done everything works fine!
Do not drill ally or steel topless! Even if it is a hot day. The only other person in the house is 6. So pulling out the metal shrapnel from my arms /chest/ neck with no sympathy was not fun. As cool as I must have looked wearing goggles/gloves and shorts...i'm a dick.
So here it is.....Thanks to @Seedy @BaDaBooM and @Vaping Bad for there support, answering my questions throughout the build!
All new builders are lucky, as you now have modmaker and stealthvape supplying about every part you need, including those elusive keystone holders!!!
....and finally....yes I make all that effort to make something small, then I go and stick a wapping great drip tip on top. I can't use anything else tho, tastes better IMO


I've never built anything, nor do I have any electrical experience....So I spent a good bit of time researching ( A LOT of time ) and watched lots of tutorials...and had a little practice at soldering some scrap etc.
Nothings really that hard, just watch people that have spent time learning all the techniques and tricks, so you don't have to! Then practice!
To start, I had a very personal specification when it came to this build -
-Small
-Sexy
-SX350 chip
-Easy change of battery
Pretty normal....until
-Wide and heavy enough not to f-in fall over every time my lil'un bounces around. MUST BE STABLE ON A TABLE!!!!!
(anyone who had used a mvp with a half decent rba will have felt this pain at some time!)
- Strong!....I like to use my mod everywhere, so must be able to withstand some wear and tear!!!!
To meet this spec, I decided I will have to fabricate my own box, plus I want to be different! No hammond for me plzzz
Decided I wanted to use steel for the body. The walls are thin (2mm ish) to keep size down, but I still wanted it to be strong as F and to have a bit of heft.
Ally sides so magnets would work and to save some weight, stopping it pulling down my trousers in public.
So I made a shopping list...
SX350 (best chip out there IMO and easily enough power for me)
Silver coated stranded copper wiring with some tough teflon coating (was valve amplifier wiring originally I think)
Stealthvape OCD connector ( I hate adjustables! Top is low profile so easy to recess + no spring = less parts to wear out/break)
Keystone battery holder (best in the buisness IMO, gold plated contacts!)
Tiny ass vandal button ( thanks Seedy
Sugru ( thanks Vapingbad
Some seedy magnets
JB Weld
Step drill bit
Bit 'o' perspex
Some box section and some ally
Then came the design....I sat with my parts, aligned them how I thought would be the most 'space efficient' and drew everything up on paper. I was ambitious, as this is my first build, and I left very little /no space.
I didn't want to sacrifice on my choice of parts, especially the switch, as its one part you use the most!
Fabrication....
Heavily modified the keystone holder to make it fit ( dremel to the top and sides) then reinforced it with perspex where there was space.
Wired up everything roughly and upgraded the chip to make sure all was well.
Drilled up the box section in 3 places...510 / switch / screen. Used the 2mm step up to recess the 510 (using the taper)
Viced up the ally plate after cutting to rough size....filed away
Soldered everything together neatly ( FLUX IS YOUR BEST FRIEND!!!), and then installed everything (paying attention to order, 510, switch, chip then battery holder)...As you can see in the pics, the switch only just fit after I bent the pins pretty damn far.
Used sugru around the chip and battery holder, smoothed everything off nicely
Fabricated the magnet holder fascia thingy...
Added magnets and pins to the face plate to hold it in place. The internal magnets are mounted in a 1mm recess, each magnet is 0.5mm thick, they make full contact and hold well, but the pins stop
any sliding around.
....Then I sat and had a hard earned vape...very satisfying feeling to have a vape your own mod!
Id definitely recommend having a go to anyone hesitating to just do it. With a chip like a sx350 its really not the difficult, just do some research and your away!
If I can do it with no experience in any of the skills required, I don't see why anyone cant if you have the time. It would be a lot simpler using a ready made box too!
I did have some hair pulling moments throughout the build...keystone holders when I purchased were only available from conrad, after paying extortionate shipping, they send me a 24v switch in place of may part, so much for German efficiency. 2nd order was the charm
This is actually v2...I tried making a box with some thicker walled extruded ally, the same as vapingbads DNA build. However the dimensions really just didn't allow for the chunkier chip. I filed away at the wall for a day or so, before realizing that it was going to be weak as F by the time I was done!
Upgrading the chip....if you use windows 7 or later, you may have a similar problem, feel free to pm me if you do. The upgrade process is simple, if the computer actually loads the f-in driver in the first place....had to use command prompt to disable driver signature. When that's done everything works fine!
Do not drill ally or steel topless! Even if it is a hot day. The only other person in the house is 6. So pulling out the metal shrapnel from my arms /chest/ neck with no sympathy was not fun. As cool as I must have looked wearing goggles/gloves and shorts...i'm a dick.
So here it is.....Thanks to @Seedy @BaDaBooM and @Vaping Bad for there support, answering my questions throughout the build!
All new builders are lucky, as you now have modmaker and stealthvape supplying about every part you need, including those elusive keystone holders!!!
....and finally....yes I make all that effort to make something small, then I go and stick a wapping great drip tip on top. I can't use anything else tho, tastes better IMO


Last edited:


 What happened with the USB ??


