red5
Achiever
- Joined
- May 14, 2016
- Messages
- 1,928
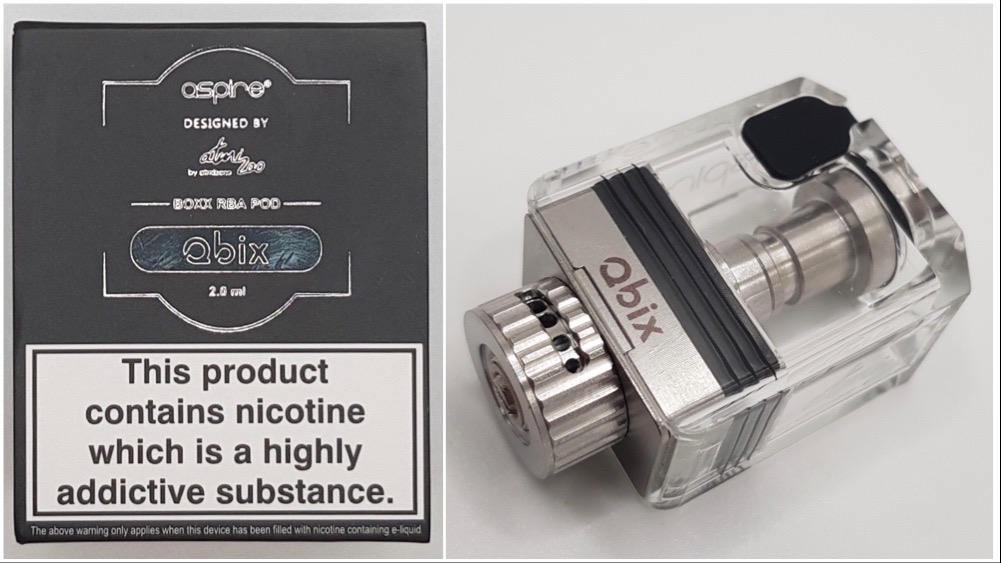
Aspire Qbix RBA Pod (Boro tank) review by Antony Lord
UK Aspire Vendor were kind enough to send out the Qbix RBA pod alongside the BOXX (which has been covered on the front page HERE) but the Qbix deserves to have its own moment in the spotlight as there’s quite a lot to cover with this clever little Boro compatible RBA.
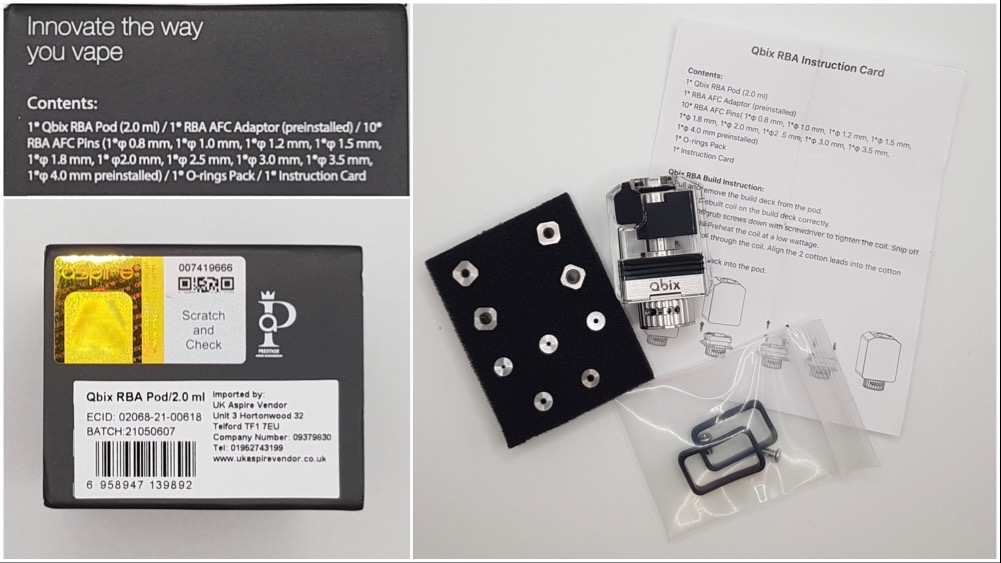
The Qbix comes in its own little Aspire Prestige packaging. Upon opening the box you’ll be presented with the Qbix itself in a foam tray, underneath this you’ll find a small instruction leaflet, a bag with spare o-rings and screws, and a second foam pad with nine airflow pins/reducers.
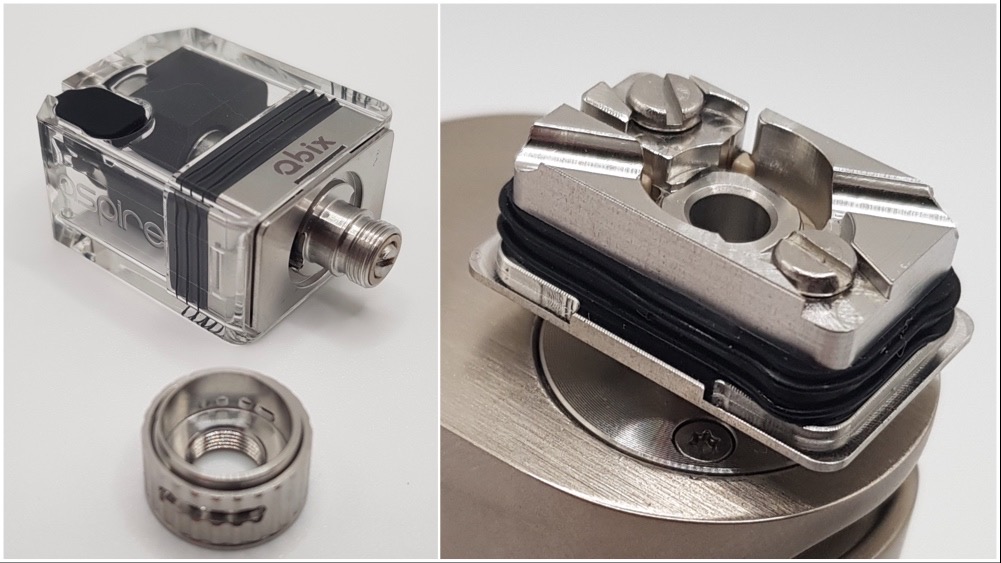
This has been designed in conjunction with Atmizoo as part of the Aspire Prestige line and bears more than a little resemblance to the DotShell RBA that Atmizoo make for the DotAio, in fact anyone who’s used one of those should be instantly at home here. I would in fact go as far as to say that this is a DotShell reimagined for use on the Aspire BOXX and other Boro tank devices, it even wicks via two small holes in the chimney section just like the DotShell does.
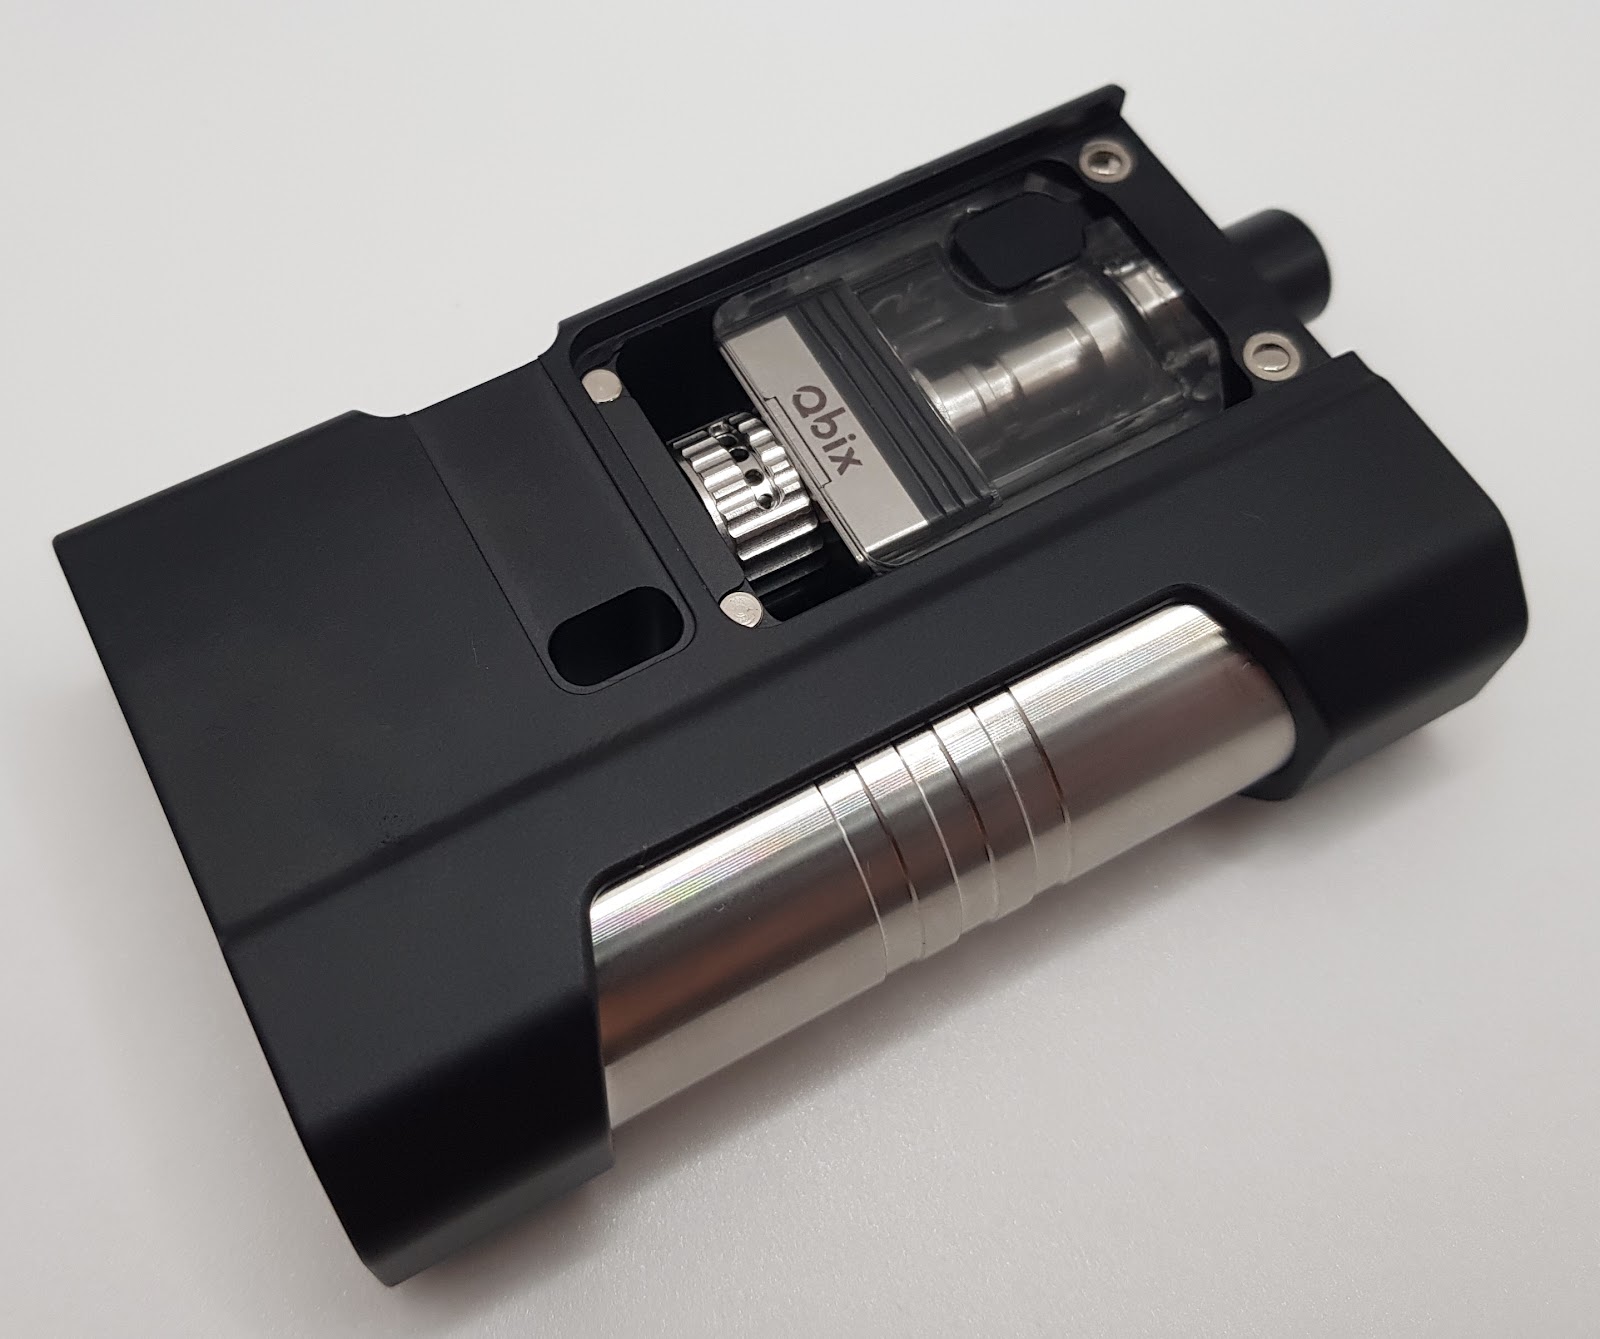
With the integrated tank and more modern fill port bung this is much less messy in use than a traditional Boro Bridge atomiser but one thing I’m not seeing online for this brilliant little RBA is spares. Whilst the tank is made from a food safe vinyl which should be fairly durable the design is very slightly different from the Nautilus and BP pods so I would ideally like to see this offered as a separate replacement item along with o-rings and fill port bungs and perhaps even the positive pin insulator. From my own experience fill port bungs in particular never last so hopefully this is something that Aspire might consider down the line.
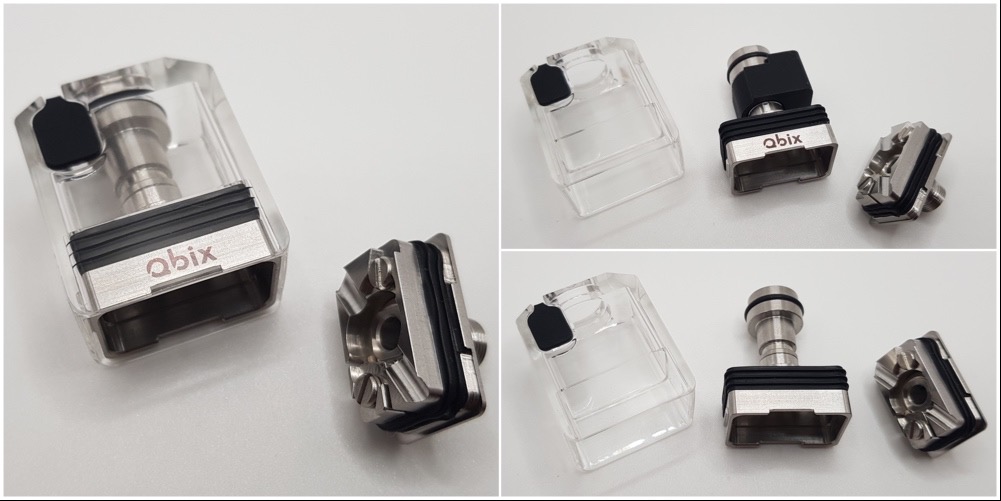
To access the build deck you simply pull the deck out from the bottom of the integrated pod, this is great as it means you can access the build deck at any time even with a full tank of e-liquid.
The chimney section can also be removed by pressing down from the top for cleaning, as this is the TPD version it came with the dreaded 2ml bung fitted but this was easily defeated to increase the capacity to 4ml (Begone foul TPD’ness - purely for testing purposes of course!). When replacing the chimney section into the tank care should be taken as the chimney is slightly offset on Boro style devices and you’ll need to line up the small arrows on the top of the chimney and the tank or your airflow will be offset from your drip tip.
There are a total of ten airflow pins/reducers included in the package, this is very generous as these will quite often be offered as optional extras in the Boro tank world. Top marks here to Aspire for not being cheeky and selling these separately.
By default the build deck comes with a 4.0mm airflow pin installed and to use the five mouth to lung (MTL) reducers (0.8, 1.0, 1.2, 1.5 and 1.8mm) you simply press fit them into the 4.0mm airflow pin as pictured above.
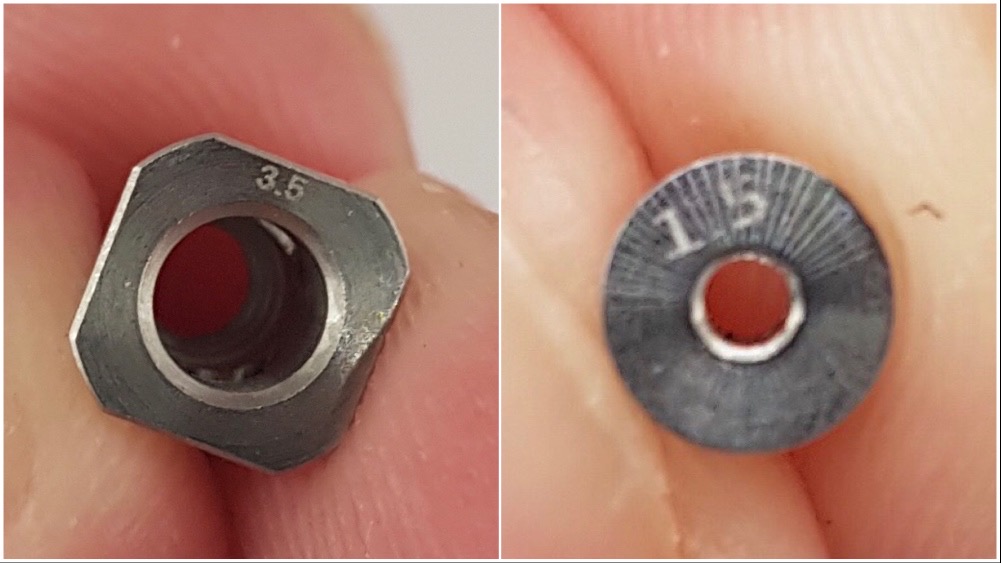
One criticism I would have here is although all the airflow pins are marked the markings are TINY and unless you catch them in just the right light they’re basically impossible to read, be prepared to break out your magnifying glass!
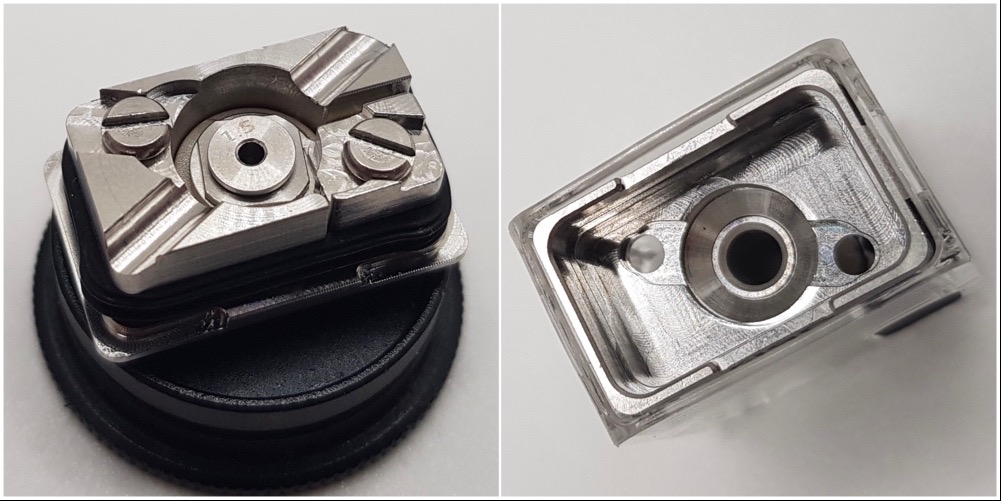
Additionally you get an extra four direct lung pins (2.0, 2.5, 3.0 and 3.5mm). The direct lung pins are a little more tricky to install and require you to disassemble the build deck entirely. First you need to unscrew the airflow control ring to expose the positive pin which you will then need to remove, paying close attention here so as not to lose the peek insulator, this will free up the installed airflow pin and positive post from the build deck. The airflow pins are inserted into the positive post and the flange on the top of the pin simply clamps the positive post into place on the large peek insulator located on the bottom of the deck.

Atmizoo have cleverly designed the integrated airflow control ring in such a way that when you remove this it exposes a standard 510 thread which means that you can place the Qbix build deck on your favoured build platform or mod to work on your builds.
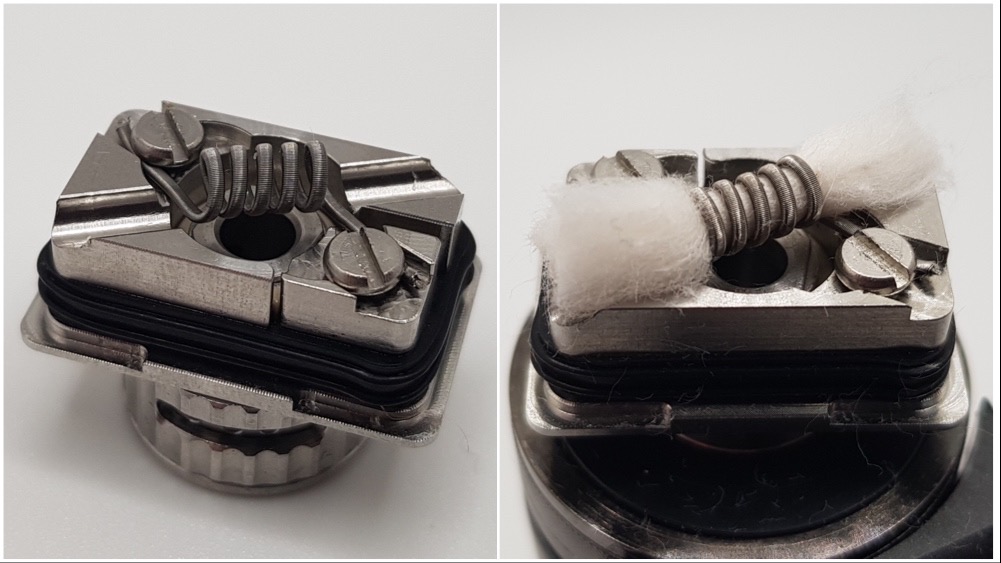
For my first build I left the standard 4.0mm airflow pin in place because I wanted to try out a simple round wire MTL build. Picking an airflow reducer was a little tricky as I would normally go for a 1.6mm airhole for a loose MTL draw, the 1.5mm reducer seemed about the closest so I went for that.

The build deck is surprisingly spacious and there's plenty of room for my standard 2.5mm inner diameter kanthal round wire build. Those deep grooves on either side of the deck serve a dual purpose of acting as a convenient guide for your building rod and it is also the area where your wicks will eventually sit. Clamping the legs down was a little more problematic, the positive lead captured the first time however the negative lead stubbornly refused to stay put and I ended up having to wrap the lead around the screw so it was facing back in toward the deck to get it captured properly! I was however pleased to see that there was ample room around the edge of the posts to clip the leads so I didn’t have any concerns about shorting out on the chimney.
For wicking I did exactly the same as I would on a DotShell, lightly fluffing the wicks and then cutting them into a diamond point by lining my scissors up along the edge of the deck. You want the wicks to comfortably sit within those two channels so you might need to give things another light trim here and there until you’re happy with the results. You might need a few practice runs here to nail the wicking but it really isn’t that difficult.
This 2.5mm inner diameter Kanthal build came out at 0.9 ohms and at 20 watts provided a nice loose MTL vape, the wicking kept up with no problems at all here. You can of course go for a tighter draw if you so wish and Aspire have certainly given you plenty of options on that front with the airflow reducers and AFC adjustment.
With the round wire build out of the way it was time to try something a little more ambitious so I quickly spun up a small Kanthal fused clapton to try next. One obvious downside of this design is that to change out the airflow reducers/pins you have to remove your build, that isn’t a problem this time as I was intending doing this anyway but it is worth bearing in mind.
I decided to leave the default 4.0mm airflow pin in place for the time being to save on time, I have to say that capturing the leads was much easier with this coil and I didn’t have any issues capturing that negative side this time, coil inserted I then wicked up as before.
This 2.5mm inner diameter build came out to exactly 0.5 ohms, flavour seemed decent at about 33 watts with one airhole on the AFC closed for a semi-restricted lung hit.
I still felt as if there was perhaps still more to come from the Qbix as although this build was pleasant enough it did feel a bit like it was a bit all air and no trousers. I fitted the smaller 3.0mm airflow insert to see what effect that would have… Bingo! A definite bump in flavour so even in direct lung mode I’d recommend that you try out a few different airflow options until you hit your personal sweet spot here.
Pros:
Cons:
Conclusion:
Aspire and Atmizoo have knocked it out of the park here, if you’re thinking of buying the BOXX and have any interest in building your own coils then you really should consider adding this to your basket at the same time. One of the beauties of the Qbix rba is that it will also work in other Boro tank compatible systems as well and at just £27.98 this is being offered at a price point unheard of in the Boro tank/rba market outside of Chinese clones so it offers excellent value for money, there’s none of that joining Facebook groups nonsense to make a purchase either as this will be widely available.
Many thanks to UK Aspire Vendor for sending out the Qbix RBA pod alongside the BOXX for review.
@ukaspirevendor
UK Aspire Vendor were kind enough to send out the Qbix RBA pod alongside the BOXX (which has been covered on the front page HERE) but the Qbix deserves to have its own moment in the spotlight as there’s quite a lot to cover with this clever little Boro compatible RBA.
The Qbix comes in its own little Aspire Prestige packaging. Upon opening the box you’ll be presented with the Qbix itself in a foam tray, underneath this you’ll find a small instruction leaflet, a bag with spare o-rings and screws, and a second foam pad with nine airflow pins/reducers.
This has been designed in conjunction with Atmizoo as part of the Aspire Prestige line and bears more than a little resemblance to the DotShell RBA that Atmizoo make for the DotAio, in fact anyone who’s used one of those should be instantly at home here. I would in fact go as far as to say that this is a DotShell reimagined for use on the Aspire BOXX and other Boro tank devices, it even wicks via two small holes in the chimney section just like the DotShell does.
With the integrated tank and more modern fill port bung this is much less messy in use than a traditional Boro Bridge atomiser but one thing I’m not seeing online for this brilliant little RBA is spares. Whilst the tank is made from a food safe vinyl which should be fairly durable the design is very slightly different from the Nautilus and BP pods so I would ideally like to see this offered as a separate replacement item along with o-rings and fill port bungs and perhaps even the positive pin insulator. From my own experience fill port bungs in particular never last so hopefully this is something that Aspire might consider down the line.
To access the build deck you simply pull the deck out from the bottom of the integrated pod, this is great as it means you can access the build deck at any time even with a full tank of e-liquid.
The chimney section can also be removed by pressing down from the top for cleaning, as this is the TPD version it came with the dreaded 2ml bung fitted but this was easily defeated to increase the capacity to 4ml (Begone foul TPD’ness - purely for testing purposes of course!). When replacing the chimney section into the tank care should be taken as the chimney is slightly offset on Boro style devices and you’ll need to line up the small arrows on the top of the chimney and the tank or your airflow will be offset from your drip tip.
There are a total of ten airflow pins/reducers included in the package, this is very generous as these will quite often be offered as optional extras in the Boro tank world. Top marks here to Aspire for not being cheeky and selling these separately.
By default the build deck comes with a 4.0mm airflow pin installed and to use the five mouth to lung (MTL) reducers (0.8, 1.0, 1.2, 1.5 and 1.8mm) you simply press fit them into the 4.0mm airflow pin as pictured above.
One criticism I would have here is although all the airflow pins are marked the markings are TINY and unless you catch them in just the right light they’re basically impossible to read, be prepared to break out your magnifying glass!
Additionally you get an extra four direct lung pins (2.0, 2.5, 3.0 and 3.5mm). The direct lung pins are a little more tricky to install and require you to disassemble the build deck entirely. First you need to unscrew the airflow control ring to expose the positive pin which you will then need to remove, paying close attention here so as not to lose the peek insulator, this will free up the installed airflow pin and positive post from the build deck. The airflow pins are inserted into the positive post and the flange on the top of the pin simply clamps the positive post into place on the large peek insulator located on the bottom of the deck.
Atmizoo have cleverly designed the integrated airflow control ring in such a way that when you remove this it exposes a standard 510 thread which means that you can place the Qbix build deck on your favoured build platform or mod to work on your builds.
For my first build I left the standard 4.0mm airflow pin in place because I wanted to try out a simple round wire MTL build. Picking an airflow reducer was a little tricky as I would normally go for a 1.6mm airhole for a loose MTL draw, the 1.5mm reducer seemed about the closest so I went for that.
The build deck is surprisingly spacious and there's plenty of room for my standard 2.5mm inner diameter kanthal round wire build. Those deep grooves on either side of the deck serve a dual purpose of acting as a convenient guide for your building rod and it is also the area where your wicks will eventually sit. Clamping the legs down was a little more problematic, the positive lead captured the first time however the negative lead stubbornly refused to stay put and I ended up having to wrap the lead around the screw so it was facing back in toward the deck to get it captured properly! I was however pleased to see that there was ample room around the edge of the posts to clip the leads so I didn’t have any concerns about shorting out on the chimney.
For wicking I did exactly the same as I would on a DotShell, lightly fluffing the wicks and then cutting them into a diamond point by lining my scissors up along the edge of the deck. You want the wicks to comfortably sit within those two channels so you might need to give things another light trim here and there until you’re happy with the results. You might need a few practice runs here to nail the wicking but it really isn’t that difficult.
This 2.5mm inner diameter Kanthal build came out at 0.9 ohms and at 20 watts provided a nice loose MTL vape, the wicking kept up with no problems at all here. You can of course go for a tighter draw if you so wish and Aspire have certainly given you plenty of options on that front with the airflow reducers and AFC adjustment.
With the round wire build out of the way it was time to try something a little more ambitious so I quickly spun up a small Kanthal fused clapton to try next. One obvious downside of this design is that to change out the airflow reducers/pins you have to remove your build, that isn’t a problem this time as I was intending doing this anyway but it is worth bearing in mind.
I decided to leave the default 4.0mm airflow pin in place for the time being to save on time, I have to say that capturing the leads was much easier with this coil and I didn’t have any issues capturing that negative side this time, coil inserted I then wicked up as before.
This 2.5mm inner diameter build came out to exactly 0.5 ohms, flavour seemed decent at about 33 watts with one airhole on the AFC closed for a semi-restricted lung hit.
I still felt as if there was perhaps still more to come from the Qbix as although this build was pleasant enough it did feel a bit like it was a bit all air and no trousers. I fitted the smaller 3.0mm airflow insert to see what effect that would have… Bingo! A definite bump in flavour so even in direct lung mode I’d recommend that you try out a few different airflow options until you hit your personal sweet spot here.
Pros:
- Lots included in the package
- Easy to build
- Integrated tank
- Easy to fill
Cons:
- Availability of spares (or lack thereof)
- Have to remove the build to change the airflow pins/reducers
Conclusion:
Aspire and Atmizoo have knocked it out of the park here, if you’re thinking of buying the BOXX and have any interest in building your own coils then you really should consider adding this to your basket at the same time. One of the beauties of the Qbix rba is that it will also work in other Boro tank compatible systems as well and at just £27.98 this is being offered at a price point unheard of in the Boro tank/rba market outside of Chinese clones so it offers excellent value for money, there’s none of that joining Facebook groups nonsense to make a purchase either as this will be widely available.
Many thanks to UK Aspire Vendor for sending out the Qbix RBA pod alongside the BOXX for review.
@ukaspirevendor